You’re most likely to have wished for the perfect outdoor kitchen if you live in a house with a yard.
It may be a maze of shrubs or a bed with ornamental flowers for some. Others prefer a strong vegetable garden.
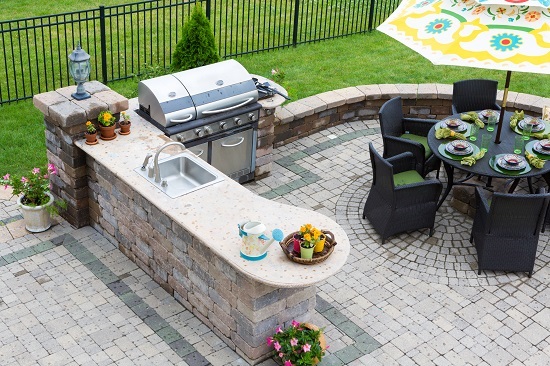
An outdoor kitchen and patio installation is a great investment if you enjoy cooking and hosting in your outdoor space. Outdoor kitchen space gives you the opportunity to enjoy all the benefits of a real kitchen while still enjoying the outdoors. You can host the perfect barbecue at any time.
It is one thing to think up backyard kitchen ideas. Making outdoor decorating a reality is another.
It can be overwhelming to think about the logistics involved in building an outdoor kitchen. It can be exhausting to think about the logistics of building an outdoor kitchen.
This is an online tool allows you to quickly create a 3D model. The software is easy to use and does not require any engineering or computer skills.
You will find a free tool will allow you to take your outdoor kitchen plans and create a plan of action. In just a few weeks, you will be able to grill steaks in your new outdoor kitchen.
Outdoor Kitchen Design: How it works
Step 1: Select Your Layout
Let’s get started.
This tool requires very little computer skills. We meant it. Kitchen Design Software requires only an internet connection. Just a few clicks will get your creative juices going.
We will first choose the layout of our outdoor kitchen. You can choose one of five options to find the perfect layout for your outdoor patio, cabana, or deck.
This kitchen layout is ideal for small spaces, under an awning, or as a floating island. Although the traditional rectangle shape is simple, you have five options: 4, 5, 6, and 8-foot lengths.
Outdoor kitchens in L-shaped shapes are ideal for patios, decks, and porches. You can choose between left- or right-aligned layouts so that you make the most of your outdoor space.
The U-shaped layout places you in the center of an outdoor kitchen layout. This layout is ideal for any space. This design is great as a standalone on the lawn or under the pavilion’s rafters.
The galley view is a great solution for narrow spaces. This parallel alignment will double your space.
Step 2: Select Your Island Size
Next, choose the size of your islands.
Coyote Outdoor Kitchens uses modules to provide the ideal combination of affordability, custom design, and easy build.
A straight layout is composed of one module. You can choose from four different sizes islands for each of the other layout options.
The U-shaped kitchen is made up of two 8-foot long islands joined by a connector. You have many options for the size of the connector. It can be 4, 5, 6, or 8 feet long.
In the upper left-hand corner of your screen, you’ll see a 3D model of your design. This useful image allows you to identify the section of your layout that you want at any given moment.
After you have chosen the lengths for your modules, it’s time to move on to the next step: selecting your appliances.
Step 3: Choose Your Grill Island Appliance Layout It’s now time for some fun!
This step will bring to life some backyard kitchen ideas that you have been dreaming about.
Let’s first configure the layout before we choose the appliances that you want to use on your grill island. This is where our outdoor kitchen design software truly shines.
Do you prefer one or two grills? What number of accessories would you like?
You will choose the grill appliance layouts and decide where the islands should be placed. There are many options.
This stage is where you will choose cutout slots. The next step will be the selection of the appliance. It is important to decide on the overall layout. This includes where the grill should fit and how much space you have for storage and accessories.
Grills can be stacked side-by-side, or you can place an accessory placeholder for a fridge or pull-out drawers.
This tool can be used to create a wide variety of outdoor DIY kitchen designs. Don’t be afraid to get locked into one design when you are ready. You can easily navigate through the steps as many times you want to create the outdoor kitchen space of dreams.
Depending on your configuration, you might see a red indicator for island overlap. This indicates a section of an island that will be connected to another module. This tool won’t allow you to place appliances in areas where the island modules overlap or join. This area of the island is not accessible for storage, but the counter space will make it possible to create a seamless corner.
You may be prompted to add more items to your order before you complete this step. This depends on the setup. You will be able add a stand for your woodfired pizza oven or a pedestal to hold our Asado ceramic smoker.
Step 4: Select Your Appliances
Do you prefer a charcoal or gas grill? Or a self-feeding wood smoker? There are even electric grill options.
This step allows you to choose from the best Coyote Outdoor Living appliances to help bring your vision to reality.
As you get closer to finalizing the design, you will notice that small, medium and big accessories make more sense. We now have the opportunity to fill those spaces with incredible gear, including stainless steel storage bins, warming shelves for keeping your buns warm, and storage drawers.
A quick administrative note: There might be a small red dot inside with a white exclamation point. This icon indicates that the dimensions of the items that are combined in this space won’t fit together.
If you are looking for gas grill that has hood lights features a deep well, then you should consider the Cayote 36-inch gas grill. It will make it difficult to accommodate certain cabinet heights. The 31-inch double-sided steel doors of the CDA2431 model storage container are a great match. Recommended pairings will have a white checkmark inside of a green dot.
You can place many other items, such as spice racks, powerburners, refrigerators or ice chests, coolers, and sinks.
You can see why outdoor patio kitchen design has never been so easy with our online tool. Once you have chosen the right options, click the arrow to view what we have created.
Step 5: View Your 3D Model
This is the moment we all have been waiting for: the big reveal!
The results of the four previous steps are brought to life on your smartphone, tablet, or computer screen in a fully rendered 3D rendering.
This step is where you can add the finishing touches to make your kitchen design truly yours. You have a variety of options for counter and stone finishes to choose from, such as stacked gray, tanstone, and replicated natural wooden tile.
Now you can take your grill for virtual spin. You can now see all the options available for finishing your grill from any angle using the 3D tool. The outdoor kitchen design software we offer is so real, it’s almost impossible not to smell the smoke.
Get a free quote
You’ve now taken your outdoor kitchen ideas and made them virtual. Now it’s time for the next step.
After you have completed all the steps above, click on the “Free Quote” button to reach out to our team. We’ll walk you through the options and help you budget your kitchen. Then, we will show you why the Coyote Outdoor Kitchen System is the best, most cost-effective, and fastest way to host the backyard barbecue of your dreams.
Call Porter Hayes Landscaping LLC immediately if you have any questions about your outdoor living requirements and If you’re thinking of adding an outdoor kitchen or patio installation.
Porter Hayes Landscaping LLC
Charleston, SC 29419
(843) 532-3270
http://www.porterhayeslandscaping.com/
No comments:
Post a Comment